Databases are an important part of most web applications. Depending on the programming language and framework, each community of developers has varying preferences in databases. Many PHP developers like MySQL, many Python and Ruby developers like Postgres, and many JavaScript developers like MongoDB.
You can use any database with any programming language. Just over time, some databases have become more popular than others within specific communities.
Since MongoDB is by far the most popular database within the JavaScript community, this tutorial will also cover MongoDB first. Once you have understood the basics, feel free to move on to other databases such as Prisma, Postgres, or even SQLite.
Separating logic and state
One core programming principle is the separation of concerns. In web applications, one way this principle is applied is by separating the application code (aka logic) from the data (aka “state”).
Think of a blog, for example. A blog might have a page to view all its articles (/articles) and a page for each individual article (/articles/how-to-be-a-programmer). You could keep all those articles in one big variable in your application’s code.
const articles = [
  { title: 'How to be a programmer', text: 'In order to be a programmer just follow these 10 simple steps ...' },
  { title: 'How to get a job as a programmer', text: 'The following 5 secret tips will land you any job ...' }
]
But first of all, it can be quite tedious to keep entire articles stored in variables in the code like this. And secondly, whenever you want to edit an article or create a new one, you actually have to update the code itself and redeploy the entire application. It would be much better if you could just update the content without having to touch the code at all.
A blog is still a very simple example. But imagine a social media platform where millions of users create new millions of posts every minute. Those platforms wouldn’t even work by updating the code on every content change.
That’s why it makes sense to use a database that is entirely separate from the code. The application code you deploy to the server or store on GitHub will most likely not contain any content but only business logic. Now, of course, there are exceptions to this - for example, if you have some static content that rarely changes (such as background images or logos). It’s your job as a programmer to determine what’s the best strategy to handle storing data. Some may need a database. But some may not. Some data might even be best stored in static text files.
If you’re not sure what the best approach would be, a database is always a safe bet.
A database is a piece of software, an application, separate from your web application.
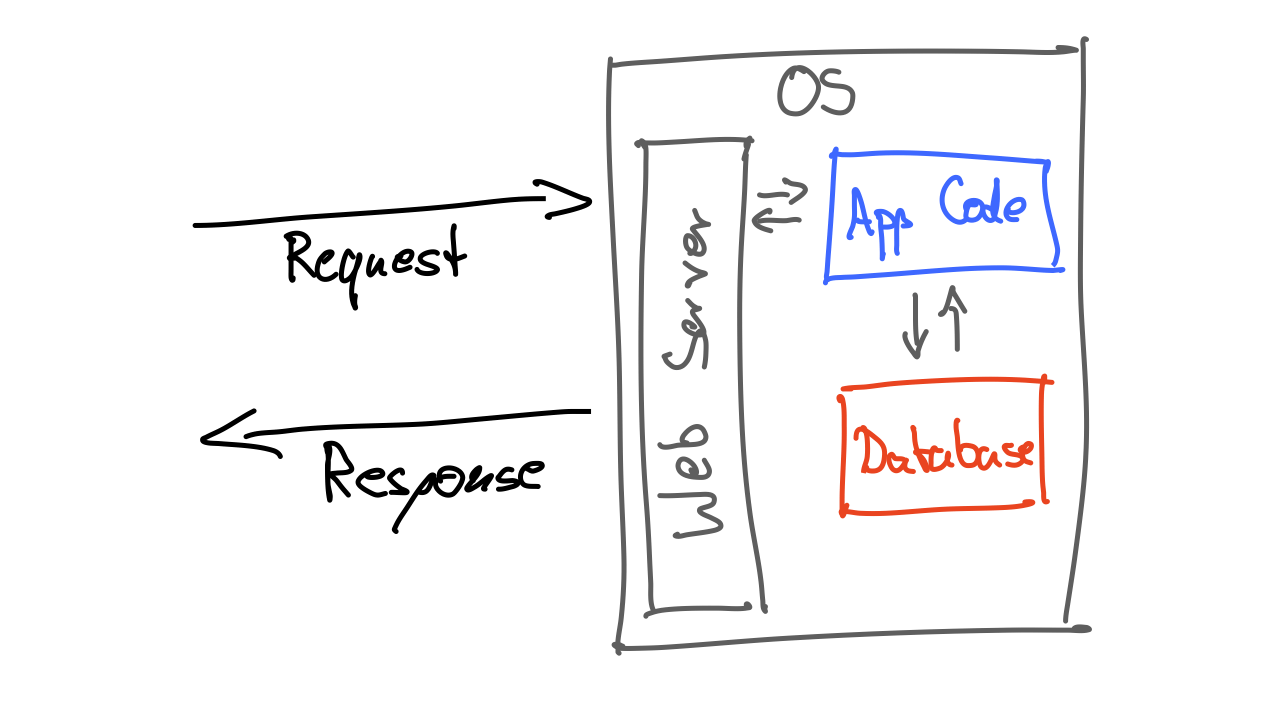
It runs in addition to your web server and application code on the server.
One thing you always have to keep in mind when working with data is the question: Where is my data stored?
If you use a database running in the cloud, the data is stored on the cloud server. If you install MongoDB as the database to run on your local computer, the data you store in it will be stored locally on your computer. So if you try out your application and add data to the database on your computer, it will not be available on the web server once you upload the application to the server.
Vice versa, if users use a web application that runs on a web server, you will not have access to that data on your local machine (unless you actively download the data from the server onto your computer).
You could technically use the database that’s on the web server and also on your local computer while developing. But that’s really not a good idea! You should always keep your development database separate from the production database (the term “production” is usually used to refer to the web server that runs your application and is used by real users). This way, you avoid problems like accidentally removing user data.
Setting up MongoDB
We will install MongoDB on our computer.
💡 MongoDB also offers a free version of its own cloud service called “Atlas”. For the sake of this tutorial, we’ll use the free, self-hosted community edition instead. This version of MongoDB can be installed on your local computer and on any server.
However, if you run into any problems setting up MongoDB locally, you can follow the instructions on of the deployment lesson and use MongoDB Atlas instead.
Go ahead and download and install the “MongoDB Community Server” software.
💡 If you are on macOS, the best way to install MongoDB is by using Homebrew. If you’re not familiar with that software, it allows you to install and update various software through the command line. It’s very commonly used for many development tools. So I’d recommend installing Hombrew first and then using it to install MongoDB.
This process may take a while. If you run into any issues, make sure to try and find an error message. Then, check the manual on mongodb.com and see if it already mentions the problem you encountered. If it didn’t, try to look on Google for the error message.
After you’ve gone through the process, you should be able to type mongod --version in the command line and see a the currently installed version of mongodb show up.
Important: The instructions linked above also include instructions on “Run MongoDB.” Whenever you want to work with the database, you need to make sure it’s running. You cannot interact with the database if the database software is not currently running. Keep that also in mind for later.
To test whether or not the database is running, you can try to connect to it on the command line by typing in:
mongoshThis should start the MongoDB console and let run commands within the database.
Before you have access to your regular command line again, you need to exit out of the MongoDB console. You can do that by hitting Ctrl + C twice or typing in .exit and hitting the Enter key.
Installing an ODM (Mongoose)
Now that we have a database software up and running, we need a way for our application code to communicate with the database. There are many different ways to make this possible. But one of the most popular ways is to use an ODM (Object Document Mapper).
ORM vs ODM Because MongoDB is a document-based NoSQL database, it’s called an “Obejct Document Mapper”. If you were to use Postgres or MySQL, you’d be dealing with a relational SQL database. When working with those, you’d be working with an ORM (Object Relationship Mapper).
The ODM is something that needs to be installed as part of the application code. It provides many useful functions to represent the data in your database and interact with it using plain JavaScript.
We’re going to use an ODM called mongoose (the probably most popular ODM for MongoDB and Node).
To install it, all you need to do is run npm install mongoose.
Setting up Mongoose
Once Mongoose is installed, you can import it into your application (somewhere at the top of your app.js file):
import mongoose from 'mongoose'Next, you need to tell Mongoose where to find the database. The database could be in the cloud somewhere (e.g., on MongoDB Atlas or on your own server), or it can be on the same device as the Express application.
To tell Mongoose where to find the database, you use a URL that very much looks like any other URL. If you have followed the instructions to install MongoDB on your own computer and you have confirmed that it’s running, the URL looks like this:
mongodb://127.0.0.1:27017Or even mongodb://localhost:27017 would work, too. This is the default configuration. So depending on how much you customized your MongoDB setup, the URL or port might look different for you. The URL will also be a different one if you use the MongoDB Atlas service.
To connect Mongoose to the database, add the following line to your code somewhere close to (but below) the const app = express().
mongoose.connect('mongodb://127.0.0.1:27017/cookieshop')You can see, with Mongoose, connecting to your database is as simple as writing a single function connect() with a single parameter. As you can also see, we added a path /cookieshop to the URL. That’s the name of the specific database.
Over time, you’ll most likely work on multiple projects. Each project should probably have its own separate database. So whenever you create a new project that uses your local MongoDB database, you should define a new and unique database name.
🐷 This is the quick and dirty solution. So for simplicity’s sake we’re just adding the database configuration in the main JavaScript file. In a real project, you’d want to keep your database configuration in a separate file (e.g.,
/config/database.js). You can always work withexportandimportto organize your project more.
Confirming the connection worked
It’s a good idea to get some feedback for yourself (as the developer) on whether or not the database connection was actually established and is working. Mongoose also offers a simple solution for that.
The connect() function returns a JavaScript promise. So you can use the then() function to execute code after successfully executing connect(). You can use catch() to run any code after any errors have occurred.
To keep it simple, you can just add a console.log() or console.error() in either of the two functions to log in the console whether or not the connection was successfully established.
mongoose.connect('mongodb://127.0.0.1:27017/cookieshop')
  .then(() => console.log('💽 Database connected'))
  .catch(error => console.error(error))
💡 If you’re not familiar with JavaScript promises, I suggest to learn about the basic concept. It’s quite relevant when working Node and JavaScript in general. In essence, promises allow you to write functions that will be executed some time later. It allows the rest of your JavaScript program to continue running and not be interrupted to wait for something else to be done. This concept is also called asynchronous programming and it’s extremely common in the JavaScript world. The
then()function can be attached to any function thatreturnsaPromise. Thethen()function accepts one parameter, which is a function that will be executed only when theconnect()function is done running and ran without any errors. Only if any error occurred when executing theconnect()function, the function that passed in with thecatch()function is triggered. The special thing about promises is that any code below themongoose.connect()code is executed immediately after theconnect()function starts running. So other parts of your code will be run before either thethen()or thecatch()is triggered.
If you (re)start the server now, you should see in the console if your database connection worked.
If the connection did not work, try to check the error message and see if you find it on Google. Also, make sure that the original connection worked. Check if the database is running (as described above).
MongoDB Compass
When working with MongoDB locally on your computer, a nice tool you may want to install is MongoDB Compass. It’s a tool that gives you a nice graphical interface to easily see all the databases and their records.
You can install it through this page:
When you start it up for the first time, it’ll ask you for the URL to your database. It’ll be prefilled already with the default local URL:
mongodb://localhost:27017
If you followed the instructions above to install MongoDB locally, you probably don’t have to change anything here and can simply click “Connect.”
Recap
In this lesson, we didn’t make many changes to our actual application code. Instead, you learned how to install MongoDB and how to connect it to your project using the ODM Mongoose.
🛠 How to practice
The setup of a database can be a little tricky. Luckily, you only have to do it once at the beginning of the project.
To practice what you have learned in this lesson, try to set up a separate database for a separate project.
Remember that the URL of the database should have a different and unique database path in the end. Otherwise, you’ll start mixing data from various apps - which, of course, would be quite bad.
