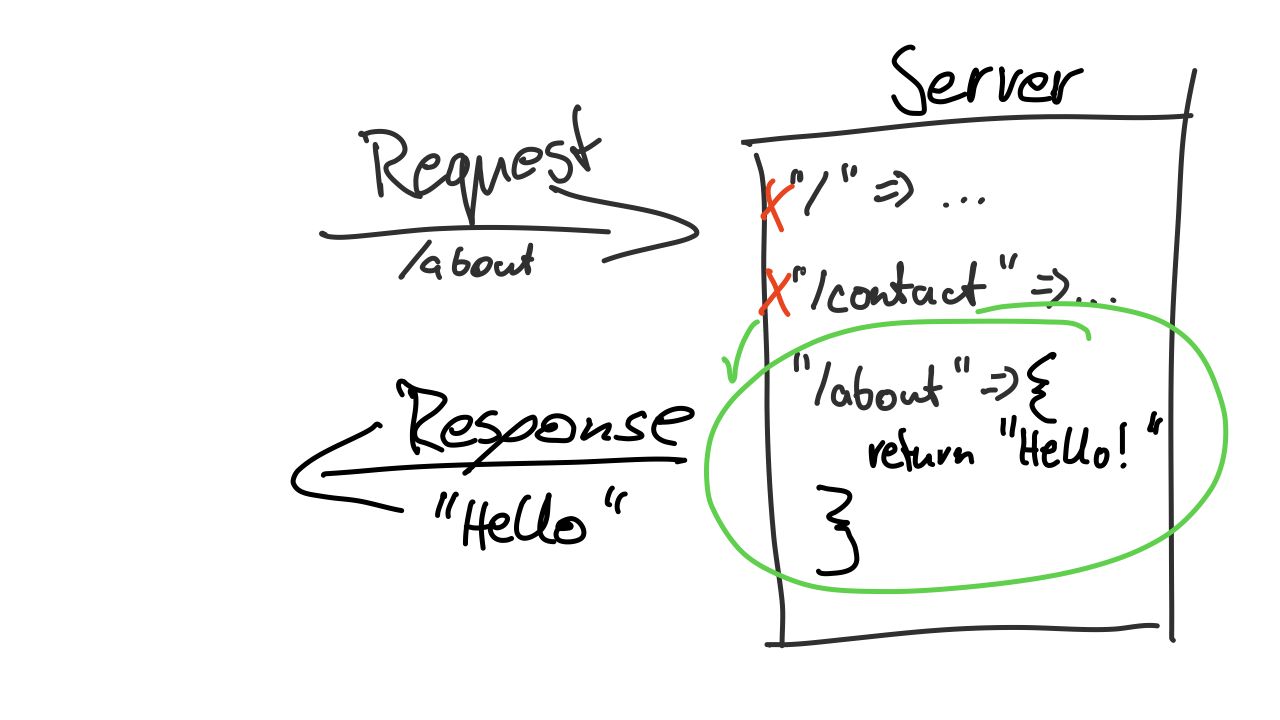
One of the core functionalities of a web server is to return different responses depending on the URL (aka the “link”) a user used to access the server.
Take, for example, Wikipedia. If you go to wikipedia.org/wiki/css you’ll expect to see a different page from when you go to wikipedia.org/wiki/html. Both pages come from the same server, as both pages are sub-pages from wikipedia.org. But the server knows to show a different page because in one case, the path is /wiki/css, and in the other case, the path is /wiki/html. Showing different responses based on different URLs like that is called routing. That means based on the defined URL (aka “path”), the request will go to a different place in your code on the backend.
As the person actually building a web backend, you have to be the one defining in your code what the user is supposed to see based on the URL they use to make a request to the server.
You could build a server from scratch writing a long condition that checks if url == '/wiki/css' and if url == '/wiki/html'. But that would be quite tedious and unnecessary to write because pretty much all web servers need this functionality. That’s exactly why frameworks like Express exist. Somebody wrote this kind of logic already for you, so building a web server is going to be much easier for you.
HTTP Methods
Most of the communication on the web (particularly in the web browser) happens in a particular format called HTTP (Hyper Text Transfer Protocol). When one computer sends a request to another, that request is usually just data such as text. To make sure all computers understand each other, developers have agreed to come up with a standard protocol so that all requests and responses follow the same format. If you want to learn more about HTTP, I recommend checking out the various MDN guides on the topic.
For now, it’s important to know that HTTP requests use different verbs. The most common verbs are GET, POST, PUT, PATCH, DELETE.
Whenever you type in a URL in the web browser and hit Enter, the web browser makes an HTTP GET request to that URL (e.g., http://google.com). The browser does that automatically. It knows how to properly format the request sent to the server, and it just assumes it should be a GET request.
However, when you fill out a contact form on a website and click the “Send” button, that request often is an HTTP POST request. When you write an HTML form, you can define the verb that should be used in the form tag. Here is an example:
<form action="http://mywebsite.com/contact" method="POST">
  <input type="email" name="email" />
  <button>Send</button>
</form>
In the example above, you see a very simple HTML form with just one input field for an email address. In the <form> tag we defined the path that the form data should be submitted to with the action attribute. And we defined the HTTP method that should be used with the method attribute. That attribute could also be changed to GET, PUT or DELETE.
As a developer, you can use these methods to be more explicit about the type of request you’re sending. Usually, when users type in a URL in the web browser, they want to GET the page to show up. They don’t send data to the server. They just want to see something. So, for example, if a user goes to mywebsite.com/contact they expect to GET the contact page of the website to show up in the web browser.
On the other hand, whenever a user fills out a contact form, they usually want to send some data to be stored in a database on the server or sent as an email to someone else. So their intention is not to GET something but to POST data to the server. So, in that case, they would send a POST request to mywebsite.com/contact.
Note that the different HTTP methods allow us to use the exact same URL both for the contact form and for rendering the contact page - because the method is different in both cases.
And similarly, imagine you have a to-do list application and want to allow users to delete items on the list. Then you could create buttons that send a DELETE request to the server.
So you may be wondering why this is even necessary. Could I not just use different URLs for that? So, for example, I could have a URL that’s for /contact-post and one that’s for /contact-get. /contact-post would be the URL used for the contact form and /contact-get would be for rendering the page. And yes, technically, that’s correct. Technically, you can just use different URLs for different functionality on your backend. But that wouldn’t be considered “best practice”.
There are very common scenarios that are the same for many web servers. That’s why people have come up with common practices and patterns to follow. You can always decide not to follow them. But it’s usually in your and everyone’s best interest to follow the standard conventions out there as they have been developed based on experience and proven to be helpful in many situations.
One of those conventions is to use HTTP methods to be more explicit about your intentions with URLs. So using GET if you want to receive information or pages, using POST if you want to write something to a database on the backend, using PUT if you want to update an existing record (e.g., update your user password on a platform), or using DELETE if you want to delete something.
Using this kind of convention also works well with a concept you’re going to learn about in the future called REST (REpresentational State Transfer).
Using HTTP methods in Express
Now that you know about different HTTP methods, let’s see how we can define those in Express.
This is an example of the simplest possible Express app with just one route:
import express from 'express'

const app = express()
const PORT = 3000

app.get('/', (request, response) => {
  response.send('Welcome to my 🍪 Cookieshop!')
})

app.listen(PORT, () => {
  console.log(`👋 Started server on port ${PORT}`)
})
Based on the code above and what you have learned about HTTP methods, you may already be able to guess how you can define specific routes with different HTTP methods in Express.
In the example above, app.get() will let you define a route responding to an HTTP GET request. Similarly, you could use app.post() or app.delete() to create routes for the HTTP methods POST and DELETE. (Reference in the original documentation)
Remember, web browsers automatically make GET requests. Try changing the app.get('/' in your code to app.post('/'. If you haven’t already, start the express server (see the previous lesson for reference). If you now try to access your website on localhost:3000 you’ll receive an error message. That’s because the browser makes a GET request while your backend only defines a response for the POST method.
What you can also do is use app.all(). As the name suggests, this method will map all HTTP requests, no matter the method, to the same function.
Defining multiple routes in Express
So now you know you can use different functions for different types of HTTP methods. Let’s look at the arguments passed to the function. The first argument is a string. In this case, it’s just '/'. A single forward slash and nothing else always refers to the so-called “root” of a website - also known as the “start page,” “home page,” or “index.” For example, going to google.com will be the same as going to google.com/. The slash with nothing behind it just signals that you are on the home or starting page.
Side note: Some websites don’t really have a page on the root and instead will automatically redirect you to a specific sub-page. For example, if you go to en.wikipedia.org, you’ll notice that you’re automatically redirected to a page with the sub-path
/wiki/Main_Page.

To define more pages, you add the same function as many times as you want. Just make sure to change the path defined in the string. You also have to start with a forward slash. It’s common practice to define paths with different forward slashes in URLs. Here are some examples:
import express from 'express'

const app = express()
const PORT = 3000

app.get('/', (request, response) => {
  response.send('Welcome to my 🍪 Cookieshop!')
})

app.get('/contact', (request, response) => {
  response.send('Reach out to us if you have any questions.')
})

app.post('/contact', (request, response) => {
  response.send('Thank you for your message. We will be in touch soon.')
})

app.listen(PORT, () => {
  console.log(`👋 Started server on port ${PORT}`)
})
If you try this in your own code, make sure to type the code by hand and don’t just copy and paste. Only by typing by hand, you’ll start to memorize the different concepts.
So you can see in the code that we have two pages now. We have a home page and a new sub-page /contact. We also have a route defined with a post method for our contact form. This isn’t relevant just yet because we can’t actually do anything with it.
Once you have put this in your code, try it out! With the running server, go to the different pages in the browser:
🐷 This is the quick and dirty solution. In a real application, you’ll want to keep routes in its own files. You’d then work with
exportandimportto organize the various files. One place, routes could go is a separate/routesor/controllersfolder. Or to keep it simpler, for now, you could put them in aroutes.jsfile. To keep this part of the tutorial simple, however, we’re going to keep most of our code in a single file, though. There will be another tutorial going into how to better organize your code.
Route callback functions
So far, you have learned about the different Express functions to define routes for different HTTP methods. You also have learned about the first argument of that function, defining a path as a string. The final part of each route is the so-called callback function.
In programming, we call a callback function, a particular type of function that runs some (undefined) time later as a response to another event being triggered.
Okay, what does that mean? In our example, it means that we want a particular function to only be executed when a user types localhost:3000 (or the URL to our server) in their web browser. Normally, if you start a program with, e.g., node app.js, the functions in that program get executed immediately, and then the program stops. A server works differently. A server runs indefinitely on an infinite loop. And we want the server to be ready and execute some specific code whenever a user interacts with it.
Above, you have learned that you can define different URLs and use routing to execute different functions based on the URL the user typed in the web browser.
Taking the example above, this is the function that will be executed when the user accesses the /contact page:
(request, response) => {
  response.send('Reach out to us if you have any questions.')
}
Defining a response
A callback function in Express always has two predefined parameters. The first one is a request object. The second one is the response object. These are predefined objects provided by Express, and you can look up all the different properties of those objects here (for requests) and here (for responses).
These two objects represent the request-response cycle. Whenever a user or client accesses a specific URL of your backend, a request comes in, represented by the request parameter.
On the server, Express will automatically run some code in the background to map the request to the correct route function. Then, the callback function of that route is executed. The client (e.g., the web browser of the user) will try to keep the connection to the server open and wait until it receives a response back from the server. In Express, you can send a response back to the client with the send function on the response object like this: response.send().
By default, you can only send a single response back to the client. As soon as that response is sent, the connection is closed, and the client is happy and doesn’t wait any longer.
If the server takes too long to respond or you forget to put the response.send() somewhere in your code, the client will eventually “time out”. You may have come across a time-out error before when trying to access a website, e.g., from your phone on a subway.
The response object has many more methods you’ll learn about later on. Also, the request object we haven’t used for anything yet. It contains all the information you’d need to know about the client making the request, such as the URL or method they accessed, but also their IP address or any additional data or cookies they have sent with the request. But you will also learn about some of its methods and properties in a later lesson.
One last thing you should know about callback functions is that they are not just meant for sending a response. You can run any and as much code as you’d like in there. So let’s say you have a website that (for whatever reason) should run some math operations before sending the response back. This is what it could look like:
app.get('/calculate-the-average-of-5-and-10', (request, response) => {
  const number1 = 5
  const number2 = 10
  const average = (number1 + number2) / 2
  response.send(`The average of ${number1} and ${number2} is ${average}`)
})
If you add that route to your application and then go to localhost:3000/calculate-the-average-of-5-and-10, you’ll get the following response:
That’s probably not a particularly useful page. But it’s supposed to demonstrate what most web backends do in larger applications. They run a whole bunch of code and call more functions and business logic before sending back a response to the client.
There is one more thing you can see that it does:
response.send(`The average of ${number1} and ${number2} is ${average}`)Here, we use a JavaScript template string to dynamically generate a response from data. This is another very important concept you’ll learn about in the next lessons. In most cases, web applications have some kind of database, and depending on the user accessing the page and some other variable factors, the response will be dynamically generated for the specific user in that specific situation. But again, you’ll learn in more detail about generating responses later.
Recap
In this lesson, how you can use different Express functions to define various routes for different paths and HTTP methods. You also learned to use callback functions to run some business logic before sending back a response to the client.
What we have not looked at yet, is how to organize the code for your routes into multiple files. There will be an advanced lesson later on. The goal of this first section is to introduce you quickly to the core concepts. Once you have a general idea of how things work, we can go over how to build things with higher code quality.
🛠 How to practice
To practice what you have learned today, let’s add one more page to the cookie shop:
- Add an about-page to the cookie shop. This page will later contain some general information about the shop.
- Make the page available through this URL: localhost:3000/about
Once you have completed that step, practice some more in a completely separate project (that is not the tutorial project):
- Define at least four different routes and return a different response for each of them.
- For at least one of the routes, run some JavaScript code (such as doing some math) before sending a response back.
- Also, for at least one of the routes, use a JavaScript template string to dynamically render some content to the user based on data previously defined in variables.
